

Covered California has redesigned their online application with a new flow and questions.
Covered California will be updated their online application CalHEERS program that will be live on September 25. This is a major renovation to the screens and application flow from the program they have used since 2013.
CalHEERS Release Notes – 17.9 From Covered California
Release Date: September 25, 2017
CalHEERS will be updated to version 17.9 on September 25, 2017. These release notes are intended to inform you of important changes to the functionality of CalHEERS.
Updated Look and Feel of Application
Previously, the CalHEERS application collected the same information for all consumers in a systematic, if non-user friendly process. The navigation and messaging provided in CalHEERS lead to frustration for many users. Also, there were some federal regulations that were not being met regarding the collection of information for some groups, such as veterans.
Now, the interface is easier to read and questions are user-friendly. Since not all questions are needed for all consumers, the application is now “dynamic” meaning questions that do not apply to a user are not displayed. This results in fewer questions and additional time savings for everyone.
Although the look and flow of the application has changed, users will continue to collect and input the same information as before.
Application Menu Simplifies Editing
The CalHEERS application returns to the “Application Menu” after every section to allow users to change their information before submitting.
- Green check marks provide high-level view of progress
- Users can review and edit household and member level information
- Users are prompted when sections are incomplete before moving on
- Household Information: Income and taxes
- Individual Information: Healthcare, SSN and immigration
Time Saving for Renewals
Previously, when a consumer wanted to renew their CalHEERS application, CalHEERS required them to review the entire application. This was a time consuming process, especially for those who knew no changes had occurred.
Now, enrollers may select “No Changes to Report” and skip ahead to the end. If a consumer changes their mind, you can always edit their info on the review pages. There are no new data fields required to renew for 2018.
One Last Chance to Change
Previously, when the application was completed, the consumer or enroller was provided a list of questions to review.
Now, with the improved interface it is much easier to review the application for completeness and edit specific sections.
- Household members now display with distinctive icons
- All member info is easily editable
- Users can navigate to each member or edit primary contact info separately
New Language for Reasonable Opportunity Period (ROP) Status
Previously, when consumers failed to provide required follow-up documentation within their Reasonable Opportunity Period (ROP), they were automatically terminated in CalHEERS or given an extension by the Service Center. Unfortunately, it was difficult to find that information within CalHEERS indicating the reason for termination. Enrollers previously had no visibility into the cases they managed.
New messages have been added to indicate the ROP status on two pages within CalHEERS; the Eligibility Results Page and the Transaction History Page. These messages are designed to better inform enrollers and consumers about their ROP status:
Eligibility Results Page: The due date to verify income has passed.
Transaction History Page: Reasonable Opportunity Period Expiration Date Updated
CalHEERs Online Application Overview From Covered California
Overview:
The Covered California CalHEERS Online Application is the primary interface for submitting online applications during Open Enrollment and Special Enrollment, and for reporting changes or renewing eligibility to health coverage. The application is designed to be accessible via mobile devices like cell phones and tablets. A user may begin an application via their desktop and then continue the application via their mobile device. The application aims to improve the user experience by dynamically displaying only those questions that are relevant to the consumer based on prior data entered and now has a new crisp and uncluttered look and feel.
The application is organized into four main sections:
- Introduction
- Household Information
- Individual Information
- Review and Submit
This Job Aid will walk through these sections and assist enrollers on how to navigate the application.
1. Save and Exit
Throughout the application, the global Save & Exit button displays at the top of the page for the enroller to save their progress at any point and exit the application.
When Save & Exit is clicked, a pop-up displays a reminder that the application is incomplete and will expire if not completed and submitted by a certain date. The application automatically populates a date that is 30 days from the application initiation date.
Important Note: During the Open Enrollment period, the expiration date is extended to the day after the Open Enrollment period ends if it has been 30 days since the initial application date.
By clicking the Close button consumers return to the Consumer Home page. Enrollers use the Save & Exit button but return to the Admin portal.
Upon returning to the Individual home page, the consumer is reminded again to complete the application by a specific date. Click the Continue Application button on the Individual home page to resume a saved application.
2. Starting a New Application
Start by clicking the Begin Application button. The Introduction section begins with the Welcome to Your Application page. In this first section, the application confirms basic information regarding the applicants
- Residency
- Consent to verify information submitted
- Qualification for healthcare subsidies
In terms of residency for example, consumers must provide their zip code. This is used to confirm that the applicant lives within the Covered California service area. Invalid zip codes will display an error meapplicationge [sic].
Note: Next to the Zip Code field there is a text link Why we’re asking. Click this link to see helpful tips about the information requested. Tooltips links like this can be found throughout the application.
The next question asks the applicant how they heard about Covered California and is optional.
The subsequent fields that display for enrollers are required:
- Application Date
- What is the source of this application? (Mail, Email, Phone, FAX, In Person )
- ECM ID (displays only if the source of application is Email, Mail or FAX)
- Enrollers should never have to fill this information out as they do not process faxed/mailed applications.
When finished click the Next button to continue.
3. Consent to Verify
The Verification of Your Information pop-up displays asking the consumer for consent to verify household information provided during the application process.
- Selecting the Yes, I agree checkbox activates the Next button and allows the enroller to proceed.
- Clicking on the Next button without checking the Yes, I agree checkbox, displays a message that the application cannot be processed online without the consumer’s consent.
4. Financial Help
The See if You Qualify for Financial Help page displays to ask the consumer the question,
Would you like to see if you qualify for free or low-cost price healthcare?
- If the user selects Yes, I want to see if I qualify, they are required to complete all sections of the application.
- If the user selects No, I don’t want help paying for my health care, all income and tax related questions are suppressed when they proceed through the application.
After selecting a choice, click the Next button to complete the Introduction section.
Note: An Application Number is assigned after completing this question, which displays in the bottom-right of the screen.
5. Application Menu
After the Introduction section, enrollers navigate to the Application Menu that displays the application sections. The Application Menu allows you to navigate between sections once information is entered in every section.
Each section displays a button or link based on the progress of the application:
- Review – this link indicates the section is complete
- Start – this button indicates the section has not yet been initiated
- Continue – this button indicates the section is incomplete
- Update – this button indicates information entered in a previous section now requires updating based on information that was entered in a subsequent section. The following text alerts display: This section requires updates before you can move on.
A checkmark displays next to the section title when a section is complete. Household Information Section
In the Household Information section, you create a profile for each household member (HHM), define relationships, identify roles within the household and input other relevant information such as tax and income data.
From the Application Menu, click the Start button next to the Household Information section. The Tell us about the people in your household page displays. Click the Add Yourself First button to begin.
Note: There is a navigation link near the top left of the page that allows you to return to the section menu while saving any information entered. In the example image to the right, users return to the Household Menu by clicking the link in the red box. This global navigation method can be found throughout the application.
The first Add Household Member page displays asking for name and date of birth. Enrollers are prompted to provide the same type of information for each person added to the household.
This includes the following:
- Name/Date of Birth
- Student
- Gender
- Marital Status
- Contact Info
- Contact Preferences
- HHM Relationships
- Origin/Race (optional)
Note: Clicking the red Cancel link on upper right side of this page removes inputs and returns the user to the previous page without saving changes. A cancellation popup will display to confirm this action. This holds true for all other input pages in the application.
After completing the Name and Date of Birth page, the user is presented a series of three questions and is required to select the appropriate response from the options displaying.
Questions include:
- Is [HHM] attending school full-time?
This displays only for HHM under the age of 18 and for subsidized households with members between the ages of 18 and 21.
- What is [HHM’s] sex?
Gender choice includes Transgender options, as well as Male and Female.
- What is [HHM] marital status?
Marital status includes Registered Domestic Partner.
Optional contact information and language preferences are collected next. Note that there are two choices for language preferences, written and verbal.
Important Note: After entering the first household member, the application number displays the applicant’s name in the bottom right of screen. The name of the first household member entered displays until the Primary Contact is identified in the Basic Information section. Once the Basic Information section is complete, the name of the Primary Contact displays next to the Application number.
Next, household relationships are established. Enrollers select the caret symbol for one of the five categories to display relationship choices.
The last Add Household Member page collects information on racial origin and is also optional.
On this last page, clicking the Done button returns you to the Tell us about the people in your household page. Users can continue adding members or review and/or edit any of the prior information entered by clicking the Review link on the household member tile.
Clicking Review displays a new page with the name and age of the HHM and a summary of the information previously entered. To change information previously entered, click the Edit link within a section. Household members can also be removed from the application by clicking the Delete button at the bottom of the page. A popup confirming the request to delete the HHM will display.
Note: If the HHM being deleted was identified as the Primary Contact, the popup advises that the Primary Contact will need to be reassigned. This is done in the Household Information section.
Click the Done button to return to the Tell us about the people in your household page. When all household members are added, click the Done button on the Tell us about the people in your household page to complete this section. Alternatively, click the Household Menu link at the top-left of the page to navigate back to the Household Menu page.
6. Basic Information Section
In this section, you are asked to provide additional information about household members. Information collected in this section includes:
- Qualifying Life Events (QLE)
- Primary Contact for your household?
- Confirm your Identity
- HHM not living with the Primary Contact
- Primary Caretaker for any children
- HHM applying for coverage
- HHM 18 years or older and in Foster care
- HHM in Medicare
- HHM who are U.S. citizens or Nationals
- HHM who are pregnant
- American Indian or Alaska Native HHM
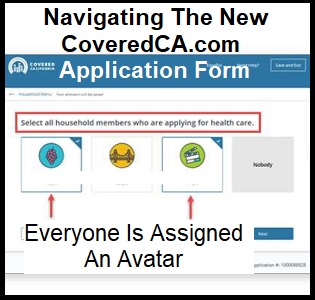
Depending on the information being collected, users select either a single HHM or multiple members. For example, when you are asked to select a Primary Contact, only one HHM is selected. On the other hand, when asked to select household members that are applying for health care, more than one HHM can be selected.
A check mark displays in the upper-right corner of the tile when a member is selected. To deselect a HHM, click the tile again.
After selecting the appropriate member(s) and clicking the Next button, users are asked to provide additional details on subsequent pages for many of the categories listed above. Note that portions of these pages may be prepopulated with information previously entered in the application.
7. Selecting a Qualifying Life Event
The Basic Information section begins by displaying either an Open Enrollment or Special Enrollment page for consumers to report life events affecting eligibility. Qualifying Life Events (QLEs) display in a dropdown on the page. Consumers applying during the Special Enrollment period must select a value from the dropdown. Selecting None of the above continues to review the consumer’s application for Medi-Cal or MCAP.
QLEs can also be applied during Open Enrollment; however, if there is no Qualifying Life Event, select None of the Above from the dropdown.
Note: Enrollers processing applications on behalf of consumers with a qualifying life event (QLE) see additional fields displayed, requiring approval.
8. Selecting Household Primary Contact
The next question displayed is Who is the Primary Contact for your household? You must click a member tile to continue. Clicking a member displays text fields for manually entering a Social Security Number (optional), resident address and mailing address.
Note: If the member selected as Primary Contact already has a Covered California login account, information from that account pre-populates the text fields of this page.
9. Address Validation
After entering the street address, a Confirm Your Address popup appears when an exact match is not found in the postal verification database. If the exact address is not confirmed, you would select the closest match from a list of alternates. If the address is not found, you can correct any errors by clicking Cancel or click OK to continue with the application and the address as it was entered.
For addresses using a zip code that spans more than one county, a list of those counties will display. Users must select one of the counties listed so that the postal validation can take place.
After the street address is resolved, you are asked if it can also be used as the member’s Mailing Address. Selecting the Yes radio button navigates the user to communication preferences. Selecting No displays new address fields to complete the mailing address.
Consumer’s Communication Preferences are selected next. The following three choices display for the question, How would [HHM] like to receive notices and other information?:
- Phone
Consumers who have already selected a preferred contact method at account creation are asked,
Is this still the best way to contact you about this application?
If not consumers can change it at this time.
If a contact method has not been previously selected, consumers must select one of the three options and enter contact information for that choice before continuing.
Note: When a consumer chooses Email as the communication method and an email fails delivery, CalHEERS changes the method of communication to Mail. A notice is mailed to inform the consumer of the change, with instructions on how to reset the method of communication.
10. Confirming Primary Contact Identity
Upon completing the Primary Contact page, click the Next button to continue. A page to confirm the primary contact’s identity displays. This page displays slightly differently for consumers than enrollers.
Several methods are available for confirming the Primary Contact’s identity. They include:
- Online
- Phone
- Electronic Upload
- In Person
- Fax
Enrollers can attest that they have visually identified the person’s identity with the use of acceptable documentation.
Enrollers can also access a Remote Identity Proofing (RIDP) service to confirm a consumer’s identity. The page presents 3 to 5 unique questions that the consumer must answer when selecting the RIDP option.
11. Household Members Not Living With Primary Contact
Next, enrollers are asked: Select all household members who do not live with [Primary Contact]. The resident and mailing address must be entered for any members selected. If all members of the household live with the Primary Contact, select Nobody and click the Next button to continue.
12. Primary Caretaker
The Primary Caretaker page displays when the household has more than one member 20 years old or younger. When this is the case, names of the children are listed and the user is asked if they all have the same Primary Caretaker.
- If Yes, the user clicks one of the adult household member tiles listed or clicks Someone else and enters their name and phone number.
- If No is selected a Primary Caretaker will need to be selected individually for each of the household members 20 years old and under. When complete the Next button becomes active and you continue to the next page.
13. Household Members Applying For Care
Next, you are asked to select all HHMs that would like to apply for healthcare next. At least one HHM must be selected in order to continue, however users can select multiple members before continuing.
14. Former Foster Youth
Next, you are asked to select household members that are Former Foster Youth (FFY). Household member tiles display for anyone between the ages of 18 and 26, as of the current system date. Text on the page explains that foster care could have been provided in any state and that qualifying individuals could be eligible for free Medi-Cal up to age 26 irrespective of income.
- Select any of the HHMs that qualify or select Nobody to continue.
Note: If there are no HHMs within this age range the page will not display.
15. Medicare
Household members currently enrolled in Medicare Part A or Part B are selected next. Users choose from the list of HHMs on the page.
- If no one is enrolled, select Nobody. The page expands and asks the user to select any HHM that may be eligible for free Medicare Part A. Again, select a HHM or click Nobody. Note that only HHMs applying for care will display.
16. Citizenship
Next, you are asked to select household members who are U.S. citizens or U.S. nationals.
The HHMs displayed will only include those applying for care. If all HHMs are selected, the Next button becomes active and the user can continue.
If any of the HHMs are not selected, or Nobody is selected, the page expands and asks the user to, Select all household members who have valid immigration documents.
In addition, non-citizens over the age of 16 year old are asked:
Is [HHM] an active duty or honorably discharged member of the military, or the spouse or child of a person who is?
Once selections are complete click the Next button to continue.
17. Pregnancy
Select any household members who are pregnant. Clicking a HHM tile prompts the user to provide the expected due date and the number of babies expected for each household member selected.
18. American Indian/Alaska Native Household Members
Next you are asked to select household members who are either American Indian or Alaska Native (AI/AN). Upon selecting a HHM, you are asked to confirm that the member is a federally recognized American Indian or Alaska Native tribe.
- Selecting No: Users click the Done button to continue.
- Selecting Yes: Users choose the state that the tribe is recognized in from a dropdown list.
- The user then selects the name of the tribe from a second dropdown. If the name is not listed, users select Tribe not Listed.
Clicking Done from the American Indian or Alaska Native page navigates the user back to the Household Menu and completes the Basic Information Section.
From the Household Menu page, users may review and edit any of the information previously entered by clicking the Review link adjacent to the Basic Information section.
If edits are made, return to the Household Menu by clicking the Done button from the Basic Information Review page.
19. Tax Information Section
Users begin the Tax Information section next by clicking the Start button from the Household Menu page. The Tax Information page displays with a brief overview of the section, information on what to expect and a helpful tip on the documentation needed.
- Click the Begin Section button to get started.
20. Select Primary Tax Filer
The question, Who is the Primary Tax Filer for your household? displays. Users are reminded that this is typically the first person listed on the tax return. Select a HHM as the Primary Tax Filer or select the Nobody files taxes tile if no one in the household plans to file taxes.
Note: In order to be eligible for tax credits a Primary Tax Filer must be selected.
After assigning the Primary Tax Filer the user must select the filing status of that person. Choices include:
- Head of Household
- Single
- Married Filing Jointly
- Married Filing Separately
Note: Married applicants filing taxes separately are not eligible for financial assistance.
21. Household Members Planning to File Taxes
Once the Primary Tax Filer page is complete click the Next button to continue. Users are asked to select all household members who plan to file taxes in the current year. All HHM tiles display except the Primary Tax Filer. Click on any of the HHM tiles to indicate that they plan to file taxes or click the Nobody files taxes Tile to continue. For each of the HHMs selected, users are asked to select the filing status of that person as described above.
22. Household Members Required to File Taxes
Select household members required to file taxes. To help users understand which HHMs to select, click the Tool Tip link on this page to display the IRS link: Do I need to file a tax return? After selecting applicable HHMs, click the Next button to continue.
23. Household Members Claimed as Dependents
Select household members expected to be claimed as a dependent for tax return purposes. A list of HHMs display (excluding the Primary Tax Filer).
- Select a dependent by clicking a HHM tile.
- Identify the person who is claiming the dependent on their tax return.
This can be a HHM previously added in the application or someone else not added. Choices include:
- All HHMs (other than the selected dependent)
- Someone else
- Nobody files taxes
When Someone else is selected, the user is prompted to enter the phone number of the person claiming the dependent.
- After all dependents and claimants are selected, click the Done button to return to the Household menu.
- If none of the HHM listed are expected to be a tax dependent, select the Nobody expects to be claimed as a dependent tile.
24. Household Income Pages
Household Income pages collect data used to determine eligibility for help paying for coverage. Note that Income pages will not appear on the application for a one-person household that identifies as Former Foster Youth.
Clicking the Begin Section button navigates users to the Estimate [year] Household Income page. From the Estimate [year] Household Income page users select individual household members to view, add or edit income information.
When adding income, users navigate through five income groups. These groups include:
- Employment & Self-Employment Income
- Government & Assistance Income
- Investment and Interest Income
- Retirement Income
- Other Taxable Income
Each of these groups contain a list of the most common types of income. The user must navigate through each group when first adding income for a household member.
Selecting the + add button from the Estimate [year] Household Income page for a household member navigates the user to that individual’s Income page starting with the Employment & Self-Employment Income page.
25. Employment & Self-Employment Income
Within the Employment & Self-Employment Income page, users select appropriate subcategories to complete the income entry form. Income entry form fields vary depending on the subcategories chosen and the input given.
From the Employment & Self-Employment Income page select a subcategory by clicking the +add button. The subcategory income entry form displays asking for the name of the employer or the income source. After adding a name additional income questions dynamically appear. For example the Employment Income page would include the following questions:
- Income amount (before taxes)
- How often does [name] get this income?
- Did [HHM] first get paid from this job before Jan 1 [year]?
- Yes – Displays next question
- No – Displays the question: When did [name] first get paid from this job? and a date field displays
- Does [HHM] still have this job?
- Yes – Displays next question
- No – Displays the question: When was the last time [HHM] got paid from this job? and a date field displays
- Do you expect this income to end in the next 4 months?
- Yes – Displays the question: When do you expect this income to end? and a date field displays
- No – Activates the Save button.
Note: If the consumer reports they are paid hourly or daily, a required field displays to capture the number of Hours or Days per week.
Click the Save button after answering the questions. The Employment & Self-Employment Income page displays showing the income added and an edit link in case further changes are needed. When ready, click the Next Income Group button to navigate to the next group,
26. Government & Assistance Income
Users continue to navigate through each income group before completing this section of the application. The income reporting process described here is similar for each income group. If there is no income to report for a group, skip it by clicking the Next income group button.
27. Tax Deductions Page
Once all income is reported, a meapplicationge [sic] displays stating that you are almost done and asks if the household member would like to claim any tax deductions. Click the Continue button. The Tax Deductions page displays for the same household member.
To claim deductions for the current tax year users click the + add button for an applicable deduction category and completes the deduction entry form. Navigation to complete this form is very similar to reporting income, as described above.
If there are no deductions to claim, users may skip this page by clicking the Save button without selecting a deduction type. Either way, clicking the Save button navigates the user to the Review [HHM] Income page.
28. Review [HHM] Income page
Review the information on the Review [HHM] Income page. If the information looks complete and accurate click the Done with [HHM] button to navigate back to the Estimate [year] Household Income page.
If it turns out that changes are still needed, the + add button and edit link for both Income and Deductions can be used before continuing.
The Review [HHM] Income page also displays the calculated Current Monthly Income and Projected Annual Income amounts based on the input provided.
29. Current Monthly and Projected Annual Income
If the Current Monthly Income (CMI) or Projected Annual Income (PAI) amounts does not align with a consumer’s expectations:
- Select the Click here if this looks wrong link under Current Monthly Income. This displays a popup with instructions for updating Current Monthly Income.
- Alternatively, select the Click here if this looks wrong link under Projected Annual Income to override the PAI amount. The Adjust Projected Annual Income popup displays. Enter a new PAI amount and click Update to save changes and to navigate back to Review [HHM] Income page.
CalHEERS displays both the previous and the updated PAI amounts. Links also display to delete or edit the amount if the consumer needs to make further adjustments.
After reviewing income, click Done with [HHM] button to navigate back to the Estimate (Current Year) Household Income page.
Important notes about income:
- CalHEERS prorates income with a mid-month begin and end date.
- Current Monthly Income displays only the income items with date ranges in the current month from each income type (Employment, Self-Employment, Other).
Upon returning to the Estimate (Current Year) Household Income page household members with income will have a caret [ ] next to the income amount reported. Clicking the caret symbol will expand the income section for that member and display an edit button.
Clicking the edit button displays the Review [HHM]’s Income page. An edit link on the Review [HHM]’s Income page displays the Edit [HHM] Income popup where you can make further income changes or delete income. When clicking the Delete button a popup display asks if you are sure about deleting the income previously entered.
- Click the Done adding income button on the Estimate (Current Year) Household Income page if no further income changes are needed.
The Household Menu page displays. You may view or update information previously entered using a Review link or click the Done button to complete the section and return to the Application Menu.
Medi-Cal is based on the monthly household income for dependents and adults. Once the application is submitted, and any of the household members are deemed eligible for Medi-Cal, a Soft-Pause is put on the account. This means all changes to the application must be made through your local county Medi-Cal office. Changes to the Covered California will have have no affect on the initial determination.
Carefully review your monthly income amount for accuracy against the latest income table thresholds for eligibility. Covered California Income Tables.
29. Individual Information Section
In the Individual Information section, users submit information about current healthcare enrollment, existing healthcare needs and citizenship status.
- Click the Start button on the Application Menu page, adjacent to the Individual Information section. The Individual Information Menu page displays listing the HHMs added earlier.
- Click the Start button for each HHM and answer the questions presented.
30. Current Healthcare Enrollment
A Yes or No question presents next for each HHM asking if ask if they have ever served in the United States military. This question is optional but helps determine if household members have, or may be eligible for, health insurance through the military or veteran health system.
Enrollers are required to select health care programs that their clients are currently enrolled in. The Medicare checkbox is dynamically marked as checked if Medicare was selected earlier in the application.
- Applicants select one or more of the plans listed or the None of the above checkbox.
After choosing any of the plans listed you are presented with the following question:
Does [HHM] expect their current health care program or Medicare coverage to end in the next 60 days, resulting in loss of coverage?
- Selecting Yes to this question displays a required date field to enter the expected end date for that coverage.
Note: When selecting Medicare, consumers are self-attesting to being enrolled in and eligible for Medicare. Also, selecting plans from this list does not preclude users from applying for coverage.
- Selecting No displays a meapplicationge [sic] that the applicant may still enroll in a Covered California plan but they will not be eligible for financial assistance.
Important Note: Keep in mind, questions appear dynamically on the page dependent on how the initial questions were answered. As such users are guided through the page and prompted to answer subsequent questions according to their previous responses.
For most applicants, including those choosing None of the above, the next question displays:
Has any employer, including a spouse or parents employer, offered [HHM] health insurance?
This does not include COBRA and Retiree health plan.
Note: This question displays for non-Medi-Cal eligible applicants only, or when the HHM is not eligible for free Medicare Part A.
- Selecting No navigates the consumer to the next page.
- Selecting Yes displays the next two questions which include:
- Does this plan meet the minimum value standards?
- Does this plan meet affordability standards?
The Next button becomes active when selecting either Yes or No for both questions; clicking Next navigates the user to the next page.
It is important to note that consumers with certain types of Minimum Essential Coverage (MEC) may be eligible to receive APTC/CSR if they have been offered but turned down enrollment in these MECs, or if their enrollment will be terminated before their coverage in a subsidized Covered California plan starts.
Users must answer the following Yes or No questions in order to complete the section:
- Has [HHM] ever gotten a service from the Indian Health Service, a tribal health program, or an urban Indian health program or through a referral from one of these programs? (For households without AI/AN members this question will not display)
- Would [HHM] like help paying for medical expenses from the last 3 months?
- Does [HHM] need help with Long-Term Care or Home and Community-Based Services?
- Does [HHM] have a physical, mental, emotional, or developmental disability?
- Is [HHM] involved in a lawsuit because of injury or accident?
- Does [HHM] have a Social Security number (SSN)?
31. Social Security Number (SSN)
Social security numbers are used to check income and other information when determining eligibility. Household members applying for health coverage must provide a SSN.
The radio button defaults to Yes for the question: Does [HHM] have a Social Security number (SSN)?
- If the response is Yes, the applicant is prompted to enter their SSN.
Note: The SSN is pre-populated if the SSN was entered previously during account creation or for the primary contact.
- If No is selected, a response is required to the question: Why does [HHM] not have a Social Security number (SSN)? Choices Include:
- Religious exemption
- Individual Taxpayer Identification Number (ITIN)
- Adoption Taxpayer Identification Number (ATIN)
- Does not qualify for an SSN
- I do not have an SSN, but have applied for one
Note: If ITIN or ATIN are selected, users are required to enter an ID number in order to continue.
32. Citizenship and Immigration Status
Next, complete immigration documentation and immigration status details for household members who are not U.S. Citizen or U.S. Nationals.
- Select an option from the Document Type and Immigration Status dropdown lists.
- You may be prompted to enter additional information in the fields that display based on the immigrant document selected.
Examples of other changes in the Citizen Information section which may display based on Document Type selection are shown in the table below.
See full document for list of immigration documents accepted
Once all citizenship and immigration status fields have been completed for a household member click the Done button to return to the Individual Information menu.
The Individual Information menu will have a Review link next to the HHM’s name once the section is completed. Click Review to revisit or edit the information previously submitted. When satisfied with the information entered for all household members click the Done button to complete the section and return to the Application Menu.
33. Review & Submit Section
The Review and Submit section summarizes information entered from all application pages. Users are asked to review the information provided before submitting the application. If neceapplicationry [sic], updates can still be made by clicking an Edit link adjacent to the information.
For each section of the application, users click the Confirm button to acknowledge that the information is correct and that the review complete. Review sections include:
- Review Household Information
- Review Tax Information
- Review Household Income
- Review Individual Information
Important Note: Editing previously entered information after completing a section can have downstream impacts to other areas of the application.
Before navigating to the Final Review section, CalHEERS performs a data check to see if it is missing information needed to determine eligibility. When required data is missing the One more thing popup displays. Information identified as needed is listed alongside an Edit link. Clicking the Edit link navigates the user to the applicable page where updates can be made. CalHEERS navigates the user back to the One more thing popup to repeat the process until all information is updated. After updating the neceapplicationry [sic] information users continue through the Final Review section.
34. Voter Registration
The Voter Registration page displays once the last Confirm button in the Application Review section is clicked. Completing the Voter Registration page is optional. Clicking the Next button navigates the user to the Sign and Submit Your Application page.
35. Sign and Submit Your Application
The Sign and Submit Your Application page includes four legal points to be addressed before submitting the application:
- An agreement to report any changes to the information given in the application.
- The applicants consent to allow CalHEERS to verify household information for up to 5 years by an identity proofing service.
- An agreement to the terms and conditions of the application.
- Certifying, by electronic PIN and electronic signature, that the questions in the application have been read, understood and answered honestly.
Click the Submit Application button at the bottom of the page to submit the application. The Eligibility Results page displays.
- If eligible, click the Choose a Health Plan button to proceed to health and dental plan selection.
- Once the application is submitted and the eligibility results reviewed, the user can continue to the plan selection and enrollment.
If at least one member in the household is employed, and eligible or conditionally eligible for APTC, the Employer Contact Information page will appear next. The consumer is required to provide employer address information before continuing with plan selection.
36. Report a Change
To report a change, click the Report a Change button on the Consumer Home page.
37. Change Application Type
If the application submitted is unsubsidized (without premium tax credits or Medi-Cal), users can change application type from within the Application Review page.
- Click the Report a Change button from the Consumer Home page to change the application type.
- Click the Consumer View button from the View Confirmation popup.
The Special Enrollment page displays
- Select the special enrollment event from the dropdown and complete the subsequent questions that display.
- Clicking the Next button navigates you to the Application Review page.
- From the Application Review page click the text link See if I qualify for free or low cost health care. The Great choice! popup displays.
- Click Yes to the question; Can we ask you some additional questions to see if you qualify for financial assistance? This displays the Household Menu page where users are prompted to update the neceapplicationry [sic] information used to determine subsidized assistance.
Covered California 17.9 Release New Application Review Files
YouTube Video
from Covered California on CalHEERs 17.9 Release Updates https://youtu.be/Kr1rjwCL5dw